
Option 1: DESKTOP Transfer:
Bulk Supply to Truck
Option 2: MOBILE APP Transfer:
Bulk Supply to Truck
Resupply Box/Truck to Truck
Desktop Resupply: Bulk Supply to Truck
1) Select "Restock" tab from the home page

2) This page displays all inventories both at and under PAR. From here, select the station inventory you wish to transfer FROM, and the truck inventory you wish to transfer TO.

3) Nice! You've started a transfer to another inventory. If you selected an inventory under PAR, the system reminds you what to resupply.

4) Scan the GS1 DataMatrix on the manufacturers box of desired product.
Lastly, Click the "+" Next to "Vials Transferred" & scan Control Value Label.
No Box? No problem. Click "Don't have a scanner?" & pick product to transfer.
Scan or type in the control value number you applied/are applying to this vial.
If your agency doesn't use control values, proceed after selecting # of vials transferred.

5) Click Save and PIN this transfer to verify its accuracy & completion.
Mobile Transfer: Bulk Supply to Truck / Box / Kit
Objective
This SOP explains how to restock or replenish an individual narcotic box or kit from main supply using the mobile device workflow. It ensures the correct unit is selected, the correct product is scanned, and the transfer is verified and completed according to system requirements.
Full Video: HERE
Key Steps
1. Open the Restock Action on the Mobile Device 0:14
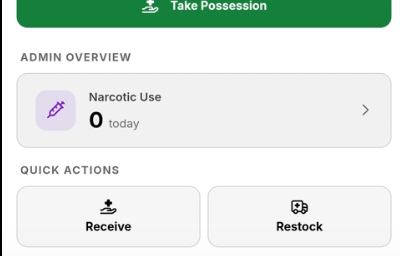
- On the mobile device, log in with admin access.
- Scroll to the quick actions section.
- Tap Restock to begin a replenishment event.
- Review the list of units shown as below par before proceeding.
2. Select the Unit That Needs Replenishment 0:22
- Choose the specific unit that needs restocking from the below-par list.
- Example: select Medic 10.
- Tap Continue to move to the scanning step.
- Confirm the camera opens for barcode scanning.
3. Scan the Manufacturer’s Box Barcode 0:41
- Retrieve the manufacturer’s box from main supply.
- Use the mobile camera to scan the GS1 pharmacy barcode on the box.
- Verify the system recognizes the correct product before continuing.
4. Scan the Controlled Substance Vial to Transfer 0:53
- Identify the vial that has already been QR coded with the scheduled QR code control value.
- Scan the vial using the mobile device.
- Confirm the vial is the correct item needed to bring the selected box back up to par.
5. Save the Transfer Details 1:07
- Tap Save after scanning the vial.
- Review the transfer summary shown on screen.
- Confirm the system indicates the correct vial is being moved to the selected unit.
- Tap Next to proceed.
6. Complete Verification 1:20
- Enter the required verification credentials.
- If the system is configured for single verification, complete it yourself.
- If double verification is required, hand the device to the second verifier to complete the approval.
- Do not finalize the transfer until verification is complete.
7. Complete Optional Recount and Reseal Steps if Enabled 1:34
- Check whether the system requires an immediate recount and reseal.
- If enabled, perform the recount and reseal as part of the transfer event.
- Confirm the replenishment workflow is fully completed before exiting the process.
Cautionary Notes
- Always verify you selected the correct unit before scanning any product.
- Scan only the manufacturer’s box GS1 pharmacy barcode and the correct QR-coded vial.
- Do not complete the transfer until all required verification steps are finished.
- If double verification is required, ensure a second authorized person completes the approval.
- Follow any facility-specific rules for recounting and resealing controlled substances.
Tips for Efficiency
- Keep the manufacturer’s box and the correct vial ready before starting the workflow.
- Confirm the unit needing restock from the below-par list to avoid selecting the wrong box.
- Use a clean, well-lit area to improve barcode and QR scan accuracy.
- If your system commonly requires double verification, have the second verifier available before starting.
- Review whether recount and reseal settings are enabled so you can complete all required steps in one session.
No Box? No problem. Click "Manual Entry" & pick product to transfer.

Mobile Transfer: Resupply Box to Truck
(Resupply, Pull Out-of-Date Items, and Optional Kit Rescan/Reseal Workflow)
Objective
This SOP outlines how to resupply a unit from a supervisor cache or dispensing inventory/machine, and how to use the same workflow to pull items out of date or place vials into quarantine. It also covers optional verification steps such as full kit rescans and resealing when required.
Full Video: HERE
Key Steps
1. Open the Resupply / Pull Out-of-Date Function
- Locate the Resupply / Pull Out of Date button in your system.
- Note: the button name may vary depending on your setup.
- Select the function to begin the workflow for restocking or removing items from circulation.
2. Confirm the Unit or Box to Be Restocked 0:18
- Review the prompt asking you to confirm the unit or box that needs restocking.
- If needed, choose a different unit from the available options.
- This same workflow can also be used to pull vials for quarantine.
3. Proceed to the Item Scan Step 0:27
- Select Next to continue.
- Prepare the vial that already has a control value on it.
- Scan the vial to register it in the resupply workflow.
4. Scan Additional Vials as Needed 0:44
- If more than one vial needs to be processed, repeat the scan step for each additional vial.
- Continue scanning until all required items have been captured in the workflow.
5. Finish the Resupply Transaction
- When all required vials have been scanned, select Finished to close out the item-processing portion of the workflow.
- Verify that the transaction reflects all items intended for restock, quarantine, or removal.
6. Complete Optional Full Kit Rescan and Reseal Requirements 1:01
- If your process requires it, perform a full kit rescan of the kit being restocked.
- If seals are used in your workflow, complete the required reseal event in the same process.
- Follow any system prompts to ensure both optional steps are documented correctly.
7. Final Verification and Witness Sign-Off 1:01
- Enter your PIN to verify completion of the workflow.
- If a witness is required, have the witness enter their PIN as well.
- Confirm that all required verification steps are complete before ending the process.
Cautionary Notes
- The button label may differ by system configuration; use the equivalent resupply/pull-out-of-date function in your environment.
- Only scan vials that are intended for the transaction and already have the appropriate control value.
- If your facility requires a witness, do not complete the workflow without witness verification.
- Ensure any quarantine, reseal, or full-kit rescan requirements are followed according to local policy.
Tips for Efficiency
- Gather all vials and the target kit/unit before starting to reduce interruptions.
- Confirm whether your workflow requires a full kit rescan or reseal before beginning.
- Scan items in one continuous sequence when possible to minimize errors.
- Keep your PIN and witness availability ready if verification is required.